Where things actually go on a face

This tip is about how to draw a whole face. It will take some patience. You can use an eraser and you can always start over. If you practice this, every face you draw in the future will be better.
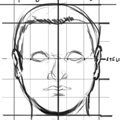
When drawing a face, it helps to know where to place things. Eyes, nose and mouth need to go somewhere. Instead of guessing, we can use a set of guidelines to help find our way.
We start with an oval. We make it big, so that we have room to fill it in. See the oval above.
Actually, no, we need a better oval, one that is symmetrical and somewhat wider at the top. See below.

Good. This is a head. Now, pressing lightly, we draw a line down the center. This is the center line for the face.
 Now we are going to add three more guidelines. They are horizontal guidelines: one at the top, one in the middle, and one at the bottom. The one in the middle is called the eye line.
 Now it gets just a little trickier. Not much, just a little.
In real life, a face is about five (5) eyes wide. So, we divide the face into five pieces by drawing more vertical guidelines. Remember to draw guidelines lightly. We can use a ruler to help keep them straight. If you made your head too small, start again and draw it bigger. But don’t give up here! Every face will be better after practicing this tip!
The first two guidelines are easy. They run up and down, along the outside of the head. The other four guidelines are equally spaced in between those two on the outside. The center line will help you space out the new vertical guidelines.
 We now have a head divided into five sections, and we can number them at the top. Why five sections? Because a face is five eyes wide! Don’t forget that.
The eyes sit on the eye line, one eye in from the outside of the face and one eye apart from each other. Are you still with me? Excellent!
On to the nose. We need a few more guidelines, but that should not worry you because you are getting good at them.
We need to divide the bottom half of the face into 3 parts. This means adding in two more horizontal guidelines in between the eye line and the line at the bottom of the face.
Now we can give this character a nose, in between the eyes and just below them.

The mouth goes just below the nose. It is wider, though. And we can put a hint of chin right underneath the mouth.
 Now we have the basics of a face! Isn’t it surprising that most of the features of the face appear on the bottom half?
If you practice the tip on drawing more realistic features (seeing-eyes-noses-and-mouths-all-over-again), your faces should look pretty good.
But something is missing. Ah, hair and ears.
I will fish that tip out of my hat and get back to you!